Publishing .NET MAUI Apps with VS Code

In this tutorial, I will guide you through the step-by-step process of publishing .NET MAUI apps using Visual Studio Code and the ‘.NET MAUI – Archive / Publish tool’ extension by me. This extension simplifies the publishing process by providing a user-friendly interface within VS Code.

Without the help of an extension

You will need to dive into a terminal, and give out the following commands, based on which platform you want to build for.

# Android:
dotnet publish -f net8.0-android -c Release -p:AndroidKeyStore=true -p:AndroidSigningKeyStore={filename}.keystore -p:AndroidSigningKeyAlias={keyname} -p:AndroidSigningKeyPass={password} -p:AndroidSigningStorePass={password}
# iOS:
dotnet publish -f net8.0-ios -c Release -p:ArchiveOnBuild=true -p:RuntimeIdentifier=ios-arm64 -p:CodesignKey="Apple Distribution: John Smith (AY2GDE9QM7)" -p:CodesignProvision="MyMauiApp"

You can learn more, how to do it without my extension at:
https://learn.microsoft.com/en-us/dotnet/maui/ios/deployment/publish-cli?view=net-maui-8.0
and
https://learn.microsoft.com/en-us/dotnet/maui/android/deployment/publish-cli?view=net-maui-8.0

But don’t waste your time. I’ve put together a Visual Studio Code extension for you that will easily save you those unnecessary lines and allow you to publish from the UI.

Step 1: Install VS Code Extension


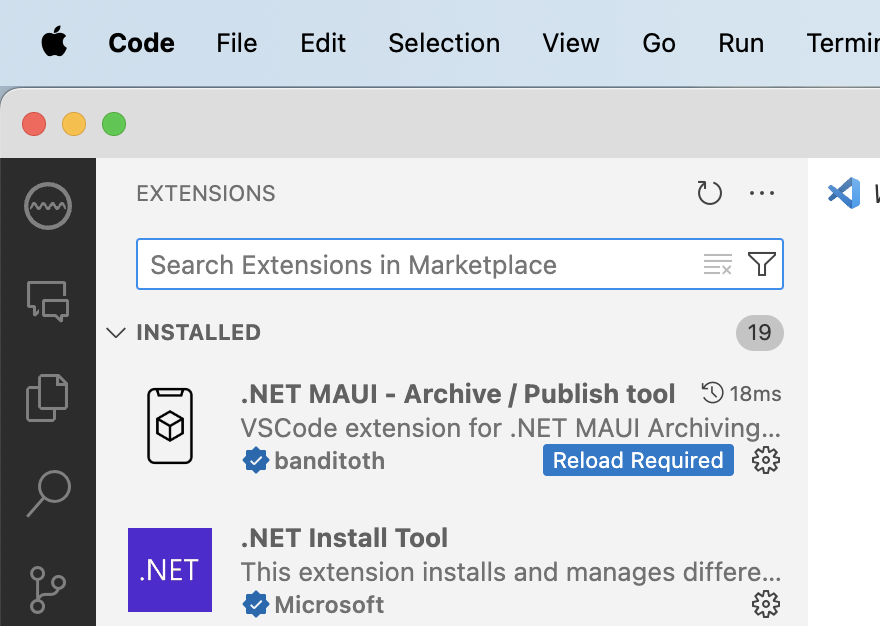
Visit the VS Code Marketplace and install the ‘.NET MAUI – Archive / Publish tool’ extension by ‘banditoth’.

You might be required to reload your VS Code instance.

Step 2: Open Your .NET MAUI Project

Launch Visual Studio Code and open your .NET MAUI project.

Step 3: Access the Command Palette

Press Ctrl+Shift+P (Windows/Linux) or Cmd+Shift+P (Mac) to open the command palette in Visual Studio Code.

Step 4: Choose Publish Android or Publish iOS

Type ‘MAUI Publish’ in the command palette. You will see two options: ‘MAUI: Publish Android’ and ‘MAUI: Publish iOS’. Select the one that corresponds to your target platform.

Publishing for Android:

The extension will prompt you to choose between a signed or non-signed binary. Select your preferred option.

Next, choose the package format – either apk (Android Package) or aab (Android App Bundle).

If signing is required (for a signed binary), the extension will list all installed keystore files. Choose the appropriate keystore.

Enter the keystore password when prompted.

The extension will start the publishing process, and you’ll see progress information directly in the VS Code output.

Publishing for iOS:

Select ‘MAUI: Publish iOS’ from the command palette.

The extension will ask for the code signing identity. Choose the desired code signing identity from the available options.

Next, choose a provisioning profile to sign the app.

The extension will initiate the publishing process for iOS, displaying progress information in the VS Code output.

Conclusion

With the ‘.NET MAUI – Archive / Publish tool’ extension, publishing your .NET MAUI apps for Android and iOS becomes a straightforward process within Visual Studio Code. You no longer need to manually execute complex CLI commands; instead, you can leverage the extension’s user-friendly interface for a seamless publishing experience. Enjoy the convenience and efficiency of this simplified workflow for your .NET MAUI projects!

Support the project

You can find more information about how to contribute on this project at the project’s github page: https://github.com/banditoth/maui-archiver-vscode

.NET MAUI iOS – Azure Pipelines error: ‘x’ is not available in iOS 16

The Error: The error message suggests that the ‘UIKit.UISceneSessionActivationRequest’ type, used as a parameter in ‘UIKit.UIApplication.ActivateSceneSession,’ is not available in iOS 16.2 and was introduced in iOS 17.0. This discrepancy indicates a version misalignment in the development environment, specifically with the iOS SDK and Xcode.

Root cause

The root cause of this error lies in the version of the macOS image used in the Azure Pipelines configuration. By default, the ‘macOS-latest’ image is pulled, which corresponds to macOS 12 (at the time of the blog post). However, the .NET MAUI app with Azure Pipelines requires macOS v13 to work seamlessly, as it aligns with the necessary dependencies for iOS development.

Resolution

To resolve this error, developers need to update the macOS image specified in the Azure Pipelines configuration. Instead of using ‘macOS-latest,’ the configuration should be modified to use ‘macOS-13.’ This ensures that the appropriate version of macOS is utilized during the build process, addressing the compatibility issues with iOS 16.2 and the required UIKit types.

Step-by-Step

-Open your Azure Pipelines configuration file (typically named azure-pipelines.yml).
-Locate the section where the macOS image is specified. It might look something like this:

pool:
  vmImage: 'macOS-latest'

-Update the image reference to ‘macOS-13’:

pool:
  vmImage: 'macOS-13'

-Save the changes to the configuration file.
-Commit the updated configuration file to your version control system (e.g., Git).
-Trigger a new build in Azure Pipelines, and the updated macOS image will be used.

.NET MAUI Android Auto: Async loading of lists

Android Auto has become an integral part of the modern driving experience, allowing users to access important information and features without taking their eyes off the road. In this blog post, we’ll explore how to implement asynchronous loading of lists in Android Auto to ensure a smooth and responsive user experience.

If you are new how to implement Android Auto in your .NET MAUI Application, then scroll to the very end of this post, and you will find a detailed tutorial video by Christian Strydom how to do it.

Implementation

Let’s assume that we have a class with a list of SomeObject named _allItems.
This list contains the data we want to display in an Android Auto list. If you dont have this private field of List<SomeObject> in your Android Auto Screen class, then define it like this: ‘private List<SomeObject> _allItems;’

We’ll use the OnGetTemplate method to check whether _allItems has data. If it doesn’t, we’ll start an asynchronous task to load the data and show a loading indicator. If it does, we’ll build the list with the existing data.

OnGetTemplate modify

In the OnGetTemplate method, we’ll first create a ListTemplateBuilder and check if _allItems has data:

public override ITemplate OnGetTemplate()
{
    var listTemplateBuilder = new ListTemplate.Builder();

    if (_allItems?.Any() != true)
    {
        // Start an async task to load data
        _ = LoadData();

        // Show a loading indicator
        return listTemplateBuilder.SetLoading(true).Build();
    }
    
    // Build the list using the existing data
    var items = BuildListItems(_allItems);
    listTemplateBuilder.AddItems(items);

    return listTemplateBuilder.Build();
}

Implement the Async Task

Now, let’s create an asynchronous task, LoadDataAsyncTask, which will invoke a method asynchronously to fetch and set the value of _allItems. We will use a hypothetical API call as an example:

    private async Task LoadData()
    {
        try
        {
            // Perform an asynchronous operation (e.g., an API call)
            var result = await SomeApiCallAsync(); // Replace with your actual API call

            // Set the value of _allItems with the result
            _allItems = result;
        }
        catch (Exception e)
        {
            // Handle exceptions and show a CarToast
            CarToast.MakeCarToast(CarContext , "An error occurred", CarToast.DurationLong).Show();
        }
        finally
        {
            // Ensure that the UI is invalidated
            // This will trigger the OnGetTemplate again.
            Invalidate();
        }
    }

Implementing asynchronous loading of lists in Android Auto ensures that your app remains responsive and user-friendly. By following this approach, you can fetch and display data efficiently, handle exceptions gracefully, and maintain a smooth user experience while driving. Android Auto provides a powerful platform for developers to create safe and engaging automotive experiences, and proper asynchronous loading is a key part of that experience.

This content has 6 months. Some of the information in this post may be out of date or no longer work. Please, read this page keeping its age in your mind.

.NET MAUI Android Error: Type androidx.collection.ArrayMapKit is defined multiple times

One common challenge is AndroidX dependency conflicts. In this blog post, we’ll guide you through resolving compilation errors related to AndroidX in .NET MAUI. Before we proceed, let’s take a look at the error message that may have troubled you:

/Users/Username/Documents/src/ProjectFolder/Project: Error JAVA0000: Error in /Users/Username/.nuget/packages/xamarin.androidx.collection.jvm/1.3.0.1/buildTransitive/net6.0-android31.0/../../jar/androidx.collection.collection-jvm.jar:androidx/collection/ArrayMapKt.class:
Type androidx.collection.ArrayMapKt is defined multiple times: /Users/Username/.nuget/packages/xamarin.androidx.collection.jvm/1.3.0.1/buildTransitive/net6.0-android31.0/../../jar/androidx.collection.collection-jvm.jar:androidx/collection/ArrayMapKt.class, /Users/Username/.nuget/packages/xamarin.androidx.collection.ktx/1.2.0.5/buildTransitive/net6.0-android31.0/../../jar/androidx.collection.collection-ktx.jar:androidx/collection/ArrayMapKt.class
Compilation failed
java.lang.RuntimeException: com.android.tools.r8.CompilationFailedException: Compilation failed to complete, origin: /Users/Username/.nuget/packages/xamarin.androidx.collection.jvm/1.3.0.1/buildTransitive/net6.0-android31.0/../../jar/androidx.collection.collection-jvm.jar
androidx/collection/ArrayMapKt.class

In my case the meaning of this error message is: Type androidx.collection.ArrayMapKt is defined multiple times

Examine Dependencies and Manually Delete bin and obj Folders:

Start by inspecting your project’s dependencies. Ensure that you have the same versions of .NET MAUI packages and other libraries. Dependency mismatches can often lead to compilation errors.

Sometimes, cleaning your project isn’t enough.
To ensure a fresh build, you might need to manually delete the bin and obj folders. You can find these folders in your project directory. They contain build artifacts and removing them helps clear cached data.

Verify NuGet Packages:

Review your NuGet packages. Look out for multiple versions of the same library, as this can lead to conflicts. If you find any conflicting packages, remove the outdated or conflicting versions. You may need to edit your project’s .csproj file to resolve these package issues.

Additionally, if you’ve recently installed a new NuGet package with has an Android dependency, make sure you have the correct version. A different version might introduce incompatibilities with the already installed pacakages.

This content has 6 months. Some of the information in this post may be out of date or no longer work. Please, read this page keeping its age in your mind.

Troubleshooting Xamarin and .NET MAUI: iOS Deployment Issues after XCode Upgrade

Are you facing deployment issues with your Xamarin or .NET MAUI iOS app after upgrading XCode? You’re not alone. Many developers encounter the frustrating “/usr/bin/xcrun exited with code 1” error message, coupled with the “actool exited with code 1” and an error about failing to locate a simulator runtime. In this blog post, we’ll delve into this problem and provide you with a solution to get your iOS app deployment back on track.

Understanding the Problem

After upgrading XCode to a newer version, you may notice that you can’t deploy your Xamarin or .NET MAUI iOS app to physical iOS devices, and the simulator targets are mysteriously missing from the drop-down menu where you select deployment targets. This issue can be perplexing and hinder your development workflow.

The error message you encounter typically looks something like this:

Resolution

To tackle this deployment challenge, you should delve into your XCode configuration and confirm that the iOS platform is both accessible and correctly installed on your development machine. Follow these steps:

  1. Launch XCode on your Mac.
  2. Click on “XCode” in the top menu bar and choose “Preferences.” This will open the XCode preferences window.
  3. Within the preferences window, select the “Platforms” section. Here, you’ll find the key settings related to platform configuration.
  4. After you’ve confirmed that all the required iOS components are installed, close and restart Visual Studio (or your preferred development environment).
This content has 7 months. Some of the information in this post may be out of date or no longer work. Please, read this page keeping its age in your mind.