.NET MAUI currently have limitations of the supported types in preferences. They can only store simple data types such as strings, integers, and booleans, and do not support more complex data types such as lists or objects. This can make it difficult to store and retrieve more complex data structures.
How to store arrays and lists, or complex classes in Preferences?
The answer is currently to serialize it. Since Preferences is supporting string saving option, you can serialize your arrays and custom classes, and store the string value.
But be aware to store large amounts of data in Preferences as a string. Consider choosing SQLite to store data when there are more than 50-100 items in an array, or your class is more complex than having 25 properties. As Microsoft marks this as a limitation: Performance may be impacted if you store large amounts of text, as the API was designed to store small amounts of text.
But there are cases when it makes sense to store other types
There are cases when it is easier to store a whole complex object on disk than to store all its properties one by one by calling preferences Set. In this case you may find useful the banditoth.MAUI.PreferencesExtension.
Usage
This package is extending the basic functions of the built in MAUI Essentials IPreferences by letting the developers to save any type of object. This is done by using JSON serialization, and saving the raw jsons as strings with the default IPreferences implementation. Since JSON arrays can be serialized back to any collection type, you can use different types when Setting the value and when Getting it back.
There are several ways to access this extension.
Dependency Injection
    private readonly IPreferences preferences;

    public MainPage(IPreferences preferences)
    {
        InitializeComponent();
        this.preferences = preferences;
    }

    private void Foo()
    {
        List<string> taleItems = new List<string>()
        {
            "The quick brown fox",
            "Jumps over the lazy dog"
        };

        preferences.SetObject<List<string>>("Tale", taleItems);

        string[] taleItemsFromPreferences = preferences.GetObject<string[]>("Tale", null);
    }
Access through Preferences
If you are used to access the preferences trough the static class, you can use this tool by accessing the Default property on the Preferences class. You can call the SetObject or GetObject extension method on it.
            // Setting the value
            Preferences.Default.SetObject<IDeviceInfo>("Device_Information", DeviceInfo.Current);
            // Getting the value
            Preferences.Default.GetObject<IDeviceInfo>("Device_Information", null);
Package’s own static reference
You can also access the SetObject or GetObject method on PreferencesExtension static class.
            // Setting the value
            PreferencesExtension.SetObject<DisplayOrientation>("Last_Display_Orientation", orientation);
            // Getting the value
            PreferencesExtension.GetObject<DisplayOrientation>("Last_Display_Orientation", DisplayOrientation.Landscape);
This content has 1 year. Some of the information in this post may be out of date or no longer work. Please, read this page keeping its age in your mind.
Why unique device and installations identifiers are important?
First, let’s define what we mean by a unique device and installation identifiers. Essentially, these are codes that are assigned to individual devices and installations of an app. They allow developers to track usage on a specific device and identify individual installations of the app. This is important because it allows us to understand how users are interacting with our app and identify patterns in usage. For example, if we notice that a particular device is experiencing a high number of crashes, we can use the device ids to track down the specific device and troubleshoot the issue.
Another important use case for unique device and installation identifiers is providing targeted and personalized content or experiences for users. For example, we can use this information to show users personalized advertisements or to offer them special deals or promotions based on their usage patterns.
In addition to these benefits, device and install ids also play an important role in security and fraud prevention. By tracking the usage of our app on specific devices, we can identify and prevent unauthorized access to the app or service. This can help to protect user data and prevent fraud and other malicious activities.
How to get unique identifiers in .NET MAUI?
On Android, you can get a unique device id from the os with accessing Secure.AndroidId. On iOS, UIDevice.CurrentDevice.IdentifierForVendor is the solution. It requires platform specific knowledge to access the provider APIs. I’ve extended my banditoth.MAUI.Packages library, so you do not need to worry about having this knowledge, just use the banditoth.MAUI.DeviceId NuGet package.
Once you have installed banditoth.MAUI.DeviceId, you need to initalize the plugin within your MauiProgram.cs‘s CreateMauiApp method. Use the .ConfigureDeviceIdProvider extension method with the using banditoth.MAUI.DeviceId;
Use the code with by resolving an instance of IDeviceIdProvider.
The GetDeviceId method returns an unique device identifier. On Android it serves the data from AndroidId, on iOS and MacCatalyst it uses the IdentifierForVendor. Windows returns the GetSystemIdForPublisher().Idas a string.
The GetInstallationId method generates an unique identifier for the application, which will be stored until the application is being reinstalled, or the application’s data being erased.
This content has 1 year. Some of the information in this post may be out of date or no longer work. Please, read this page keeping its age in your mind.
banditoth.MAUI packages just got a new package: banditoth.MAUI.JailbreakDetector. 2022 was a great year for me in a software development perspective, my MAUI packages got downloaded over more than 1500 times, which is a great achievement for me. I’m keeping up the work, and having a new package on my palette: A lightweight root and jailbreak detection algorithm for Android and iOS with .NET MAUI.
What is jailbreaking?
Jailbreaking is the process of removing the limitations imposed on iOS devices by Apple. It allows users to install apps and tweaks that are not available on the App Store, customise the appearance of the operating system, and access features that are otherwise restricted. Jailbreaking an iOS device is considered to be a violation of Apple’s terms of service, and it can also make the device more vulnerable to security risks.
What is rooting?
Rooting is the process of allowing users of smartphones, tablets and other devices running the Android mobile operating system to attain privileged control (known as root access) over various Android subsystems. Rooting is often performed with the goal of removing limitations that hardware manufacturers or carriers place on some devices, thereby providing the latest versions of Android to devices that no longer receive official updates, or unlocking features which are otherwise unavailable to the user. Rooting is also often used to remove pre-installed apps, known as bloatware, that the manufacturer or carrier included on the device and which the user may not have wanted.
Why jailbreak and root protection is important?
When a device is jailbroken or rooted, it can become more vulnerable to security risks because the jailbreak process involves disabling certain security measures and exposing the device to potentially malicious software. This can compromise the security and stability of the operating system, and it can also make the device more susceptible to being hacked or compromised in other ways. By implementing jailbreak protection, software developers can help to ensure that their apps and systems are running on a secure and stable platform, which can help to protect the device and its users from various types of attacks and vulnerabilities.
Use jailbreak and root protection in .NET MAUI
Install the banditoth.MAUI.JailbreakDetector NuGet in order to protect your apps against vulnerabilities.
Initalize the library in the MauiApp.cs file within the CreateMauiApp method, like this:
You can dependency inject the jailbreak detector instance, by resolving an instance of IJailbreakDetector. Store the instance in a private readonly field in your class, or use it directly.
    public async Task CheckJailbreakOrRoot()
    {
        if(_jbDetector.IsSupported())
        {
            if(await _jbDetector.IsRootedOrJailbrokenAsync())
            {
                // Code when jailbroken or rooted
            }
            else
            {
                // Code when clear
            }
        }
    }
By calling ScanExploitsAsync you can process the discovered exploits and warnings during the scan – It returns a ScanResult. ScanResult has a property named PossibilityPercentage. This percentage tells you how confidently you can tell whether a device has been jailbroken or rooted. Different types of tests contribute different weights to the final result.
    public async Task CheckJailbreakOrRoot()
    {
        ScanResult scan = await _jbDetector.ScanExploitsAsync();

        if(scan == null)
            return;

        foreach(var exploit in scan.Exploits)
        {
            // Get detailed information about the exploits here
        }

        if(scan.PossibilityPercentage < 5)
        {
            // Custom code when only 5% possible that the device is rooted or jailbroken
        }
    }
Remarks
Please note that there are many different kinds of jailbreaks and roots. It is possible that this package does not properly support the detection of these different techniques. If you find that filtering does not work on your device, please help by expanding the code repository.
This content has 1 year. Some of the information in this post may be out of date or no longer work. Please, read this page keeping its age in your mind.
If you need a solution to create multilingual applications without the hassle of implementing all kinds of code, I have good news for you. I’ve migrated my Xamarin.Forms package to .NET MAUI, and you can easily build multilingual applications with MAUI. No need to restart the application, the language takes effect immediately and works on all platforms. You can also use it from XAML, and C# code. It can handle multiple resource files at the same time. It can store the last language set by the user, and the next time you restart it, it will use the same language as the last time the user set it. But instead of letters, watch this video to see what exactly it can do:
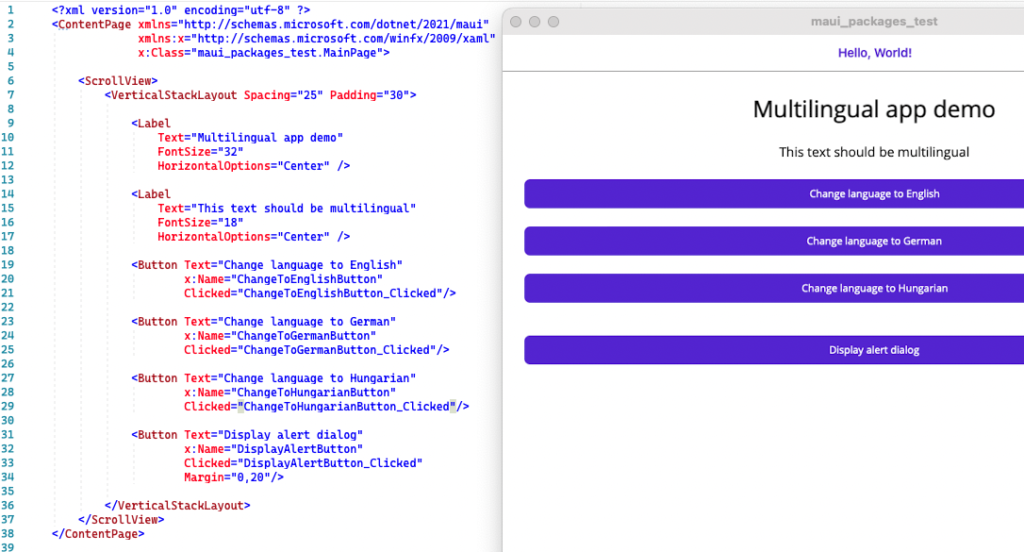
To start with, I’ve put together a demo app for you for the sake of demonstration. There is no extra functionality, just 4 buttons. Three of them are to change the language of the application, and one of them is to give us a pop-up window. There is no logic to it yet, but together we will build on the article.
The easiest demo app in the world
Create translation files
The first thing you will need are files containing multilingual translations. If you are familiar with Xamarin Forms, I will not surprise you: we will use files with RESX extension. By default, all MAUI applications include a directory called Resources. In this directory, I create a directory called Translations next to the Fonts, Images, and Raw directories, where I put the translations used by the application.
Decide what the default language of your application should be. This is important because the default language is not indicated by a language code at the end of the filename. This language (and file) will be the one that the application will use as fallback, so that if, say, the application can’t find the text in the Hungarian or German translations, it can print it out in that language. In my case, the default language of the application will be English, so I didn’t specify it in the filename.
I’ve created translations for each language with this data:
	<data name="WelcomeMessage" xml:space="preserve">
		<value>The quick brown fox jumps over the lazy dog</value>
	</data>
	<data name="AlertTitle" xml:space="preserve">
		<value>Important notice</value>
	</data>
	<data name="AlertContent" xml:space="preserve">
		<value>.NET Bot is cute!</value>
	</data>
	<data name="AlertConfirm" xml:space="preserve">
		<value>Agree</value>
	</data>
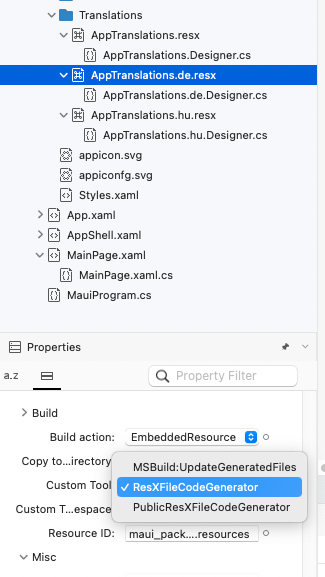
Since ResX files are set by default to generate a code-behind file from their data, this automatic generation should be disabled for all ResX files other than the default language.
This can be easily done on windows, just click on the file (in this case the German translation) and in the properties window, under Custom tool, clear the ResxFileCodeGenerator value. If you are using Visual Studio on a Mac, you cannot delete this from the interface, so you have to manually remove the option in the project file.
For Visual Studio for mac, find the name of the files containing the translation in the project and delete the following lines:
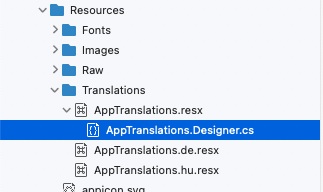
If you did everything right, you will only have these files. If there are any ‘.Designer’ files left in the Solution, feel free to delete them. The important thing is that when you compile the application, they are not recreated by Visual Studio
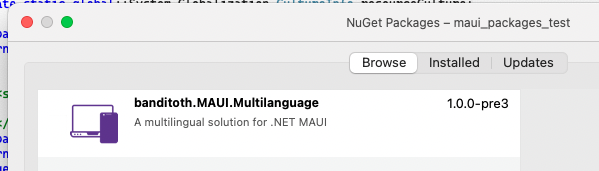
Install banditoth.MAUI.Multilanguage
Click on your project with right, then select ‘Manage NuGet Packages’. Search for banditoth.MAUI.Multilanguage in the search bar, and install the result with the exact same name of your search text 🙂 This project is available on GitHub by the way, so if you are experiencing issues with it, you can report over here: https://github.com/banditoth/MAUI.Packages
Initialise the component
Let’s navigate to your MauiProgram.cs file, and add some init logic in it!
	public static MauiApp CreateMauiApp()
	{
		var builder = MauiApp.CreateBuilder();
		builder
			.UseMauiApp<App>()
			.ConfigureFonts(fonts =>
			{
				fonts.AddFont("OpenSans-Regular.ttf", "OpenSansRegular");
				fonts.AddFont("OpenSans-Semibold.ttf", "OpenSansSemibold");
			})
            .ConfigureMultilanguage(config =>
            {
                // Set the source of the translations
                // You can use multiple resource managers by calling UseResource multiple times.
                config.UseResource(AppTranslations.ResourceManager);

                // If the app is not storing last used culture, this culture will be used by default
                config.UseDefaultCulture(new System.Globalization.CultureInfo("en-US"));

                // Determines whether the app should store the last used culture
                config.StoreLastUsedCulture(true);

                // Determines whether the app should throw an exception if a translation is not found.
                config.ThrowExceptionIfTranslationNotFound(false);

                // You can set custom translation not found text by calling this method
                config.SetTranslationNotFoundText("Transl_Not_Found:", appendTranslationKey: true);
            });

        return builder.Build();
	}
Use it in code
Usage in XAML
In order to use our translations in XAML files, we need to declare the tool’s namespace in XAML. Go to the top of your XAML file, and make the following declaration:
Wherever we need to pass multilingual texts to or from another method, the ITranslator interface comes in handy. This interface is registered in the MAUI ‘s dependency container, so it can be retrieved from the container by constructor injection for example.
Unfortunately currently .NET MAUI is not supporting Constructor injection for Shell, but you can request any service from anywhere by adding this little work around to App.xaml.cs (but its definitely not nice):
	public App(IServiceProvider serviceProvider)
	{
		InitializeComponent();
        ServiceProvider = serviceProvider;
		MainPage = new AppShell();
    }

    public static IServiceProvider ServiceProvider { get; private set; }
The localized string can be retreived like this (This example shows an Alert dialog for the user in the correct language)
This content has 2 years. Some of the information in this post may be out of date or no longer work. Please, read this page keeping its age in your mind.