.NET MAUI: Get unique device and installation ids for your app

Why unique device and installations identifiers are important?

First, let’s define what we mean by a unique device and installation identifiers. Essentially, these are codes that are assigned to individual devices and installations of an app. They allow developers to track usage on a specific device and identify individual installations of the app. This is important because it allows us to understand how users are interacting with our app and identify patterns in usage. For example, if we notice that a particular device is experiencing a high number of crashes, we can use the device ids to track down the specific device and troubleshoot the issue.

Another important use case for unique device and installation identifiers is providing targeted and personalized content or experiences for users. For example, we can use this information to show users personalized advertisements or to offer them special deals or promotions based on their usage patterns.

In addition to these benefits, device and install ids also play an important role in security and fraud prevention. By tracking the usage of our app on specific devices, we can identify and prevent unauthorized access to the app or service. This can help to protect user data and prevent fraud and other malicious activities.

How to get unique identifiers in .NET MAUI?

On Android, you can get a unique device id from the os with accessing Secure.AndroidId.
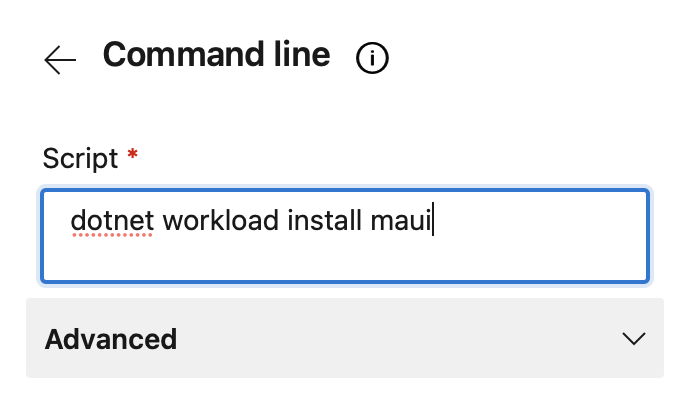
On iOS, UIDevice.CurrentDevice.IdentifierForVendor is the solution. It requires platform specific knowledge to access the provider APIs. I’ve extended my banditoth.MAUI.Packages library, so you do not need to worry about having this knowledge, just use the banditoth.MAUI.DeviceId NuGet package.

Once you have installed banditoth.MAUI.DeviceId, you need to initalize  the plugin within your MauiProgram.cs‘s CreateMauiApp method. Use the .ConfigureDeviceIdProvider extension method with the using banditoth.MAUI.DeviceId;

    public static MauiApp CreateMauiApp()
    {
        var builder = MauiApp.CreateBuilder();
        builder
            .UseMauiApp<App>()
            .ConfigureFonts(fonts =>
            {
                fonts.AddFont("OpenSans-Regular.ttf", "OpenSansRegular");
                fonts.AddFont("OpenSans-Semibold.ttf", "OpenSansSemibold");
            })
            .ConfigureDeviceIdProvider();
#if DEBUG
        builder.Logging.AddDebug();
#endif

        return builder.Build();
    }

Use the code with by resolving an instance of IDeviceIdProvider.

The GetDeviceId method returns an unique device identifier. On Android it serves the data from AndroidId, on iOS and MacCatalyst it uses the IdentifierForVendor. Windows returns the GetSystemIdForPublisher().Idas a string.

The GetInstallationId method generates an unique identifier for the application, which will be stored until the application is being reinstalled, or the application’s data being erased.

This content has 1 year. Some of the information in this post may be out of date or no longer work. Please, read this page keeping its age in your mind.

Configure CI pipeline with .NET MAUI Release candidate (for NuGets)

In order to do automated builds in Azure DevOps with the .NET MAUI Release Candidate release, we need a few extra steps in the pipeline configuration. I used these steps to ensure that the NuGet packages I develop are automatically compiled and uploaded to NuGet.org. In this article I won’t go into detail about how to create a CI pipeline, I just want to show you the difference from a normal CI pipeline. I haven’t tried building and deploying applications in the cloud at the moment, but it can probably be done. Also, I don’t go into how to make the package automatically go to NuGet.org, for that I recommend an earlier article (and also how to create a CI/CD pipeline): https://www.banditoth.net/2021/11/09/azure-devops-setup-private-nuget-feed-with-ci/

Since a final version of .NET MAUI has not been released as of today, in order to build our applications in the cloud, we need to install the MAUI Workload on the Agent.
If we do not do this, we may encounter the following error:

Error NETSDK1147: To build this project, the following workloads must be installed: maui-windows

Adjust your pipeline

In order to install the workload on our build agent, create a new task at the very beginning in the pipeline file, which is executes a command in the command line:

This will result the following task in the yaml file:

- task: CmdLine@2
  inputs:
    script: 'dotnet workload install maui'

The installation of the workload will take about 5 minutes.

From now on, you will be able to use .NET Maui references on the pipelines too. This will let you build your packages in the cloud.
Once MAUI will be officially available, probably you don’t need these steps.

This content has 2 years. Some of the information in this post may be out of date or no longer work. Please, read this page keeping its age in your mind.

Azure DevOps: Setup private NuGet feed with CI

In case you need a private NuGet feed, you can do it in Azure DevOps. This can be handy for businesses reusing their code between several codebases.

What will contain the example

In this tutorial, I will show you how to share code through NuGet packages so that it can be used in multiple projects. The Example will walk you through the game engine of an IDLE game. IDLE games are games that do not require much user interaction. The point of games is that they run or produce even when the user is not playing them. The goods produced offline can eventually be used by the player, to upgrade producers or to buy more producers.

The game engine is developed on the IDLEGAMEENGINE branch. Different games, such as a restaurant game or a programming game, can use this game engine. The games have a common logic of operation, only the story of the games differs. This design helps in development to fix bugs by only having to fix the bug in one place and it will be fixed in all games.

Step 0: Create your shared code

I will not go into details about the implementation of the game engine in this tutorial. The point is to create source code that you want to share with other source code.

Step 1: Create the NuGet feed

Go to your projects Azure DevOps site, and select Artifacts from the list on the left. Push the Create feed button. You can select from several visibility options for the new feed.

Step 2. Automate NuGet package publish to the feed

You probably have a repository with the code, what you want to share. Go To Pipelines on the left, then create a pipeline to get NuGet packages published automatically. (If you are experienced, you can make Release pipelines) In the following sections, i will guide you through how to make a CI pipeline, to pack and publish the NuGet packages automatically every time the main branch gets updated.

Navigate to Pipelines section

Go to pipelines and Select create pipeline button.

Select where do you store the code what you want to publish to your private NuGet feed. In my case, I store the GameEngine code in Azure DevOps, so I will continue with this.

Select the Repository which contains the code to be shared.

Select the desired build template for the project. I’ve implemented the core code in .NET Core, so i will continue with ASP.NET Core.

By default this template creates you a NuGetToolInstaller task, a Nugetcommand Task, and a VS Build task.

We will add a 4th task which can be added by searching for NuGet task.

Set up the tasks parameters as the following: Command should be push. The path to the NuGet packages to publish should be the path where the VSBuild builds the application.

Select the target feed location properly. My target feed is at the same organization, so it will appear in the dropdown list. For External NuGet server, you will need to specify a connector to that resource.

Ensure that, the NuGet package will only build, when the csproj is configured to build as a NuGet package. You will need the following settings for your project in order to make a NuGet from it.

Save the pipeline and run it. If you have configured everything correctly, you will see a lot of green ticks in the progress window

This seems to be well configured

When you navigate to the Artifacts/Packages section, you will see that the NuGet package has been pushed successfully to the private feed.

The recently pushed NuGet will appear here

Step 3.: Use your private repository on your projects

In order to use the recently updated package, you will need to set up your local Visual Studio instance to be able to use your private feed.

Adding a new package source

Go to your VS settings, select the NuGet section, and click on the Sources subsection. Click On add and define the connection details presented by clicking the “Connect to feed” button in the Azure DevOps / artifacts section.

Once you have configured the Visual Studio well, you will see the NuGet Package available when you are trying to add a new package to your proejct.

This content has 2 years. Some of the information in this post may be out of date or no longer work. Please, read this page keeping its age in your mind.

NuGet lokális Cache törlés egyszerűen

Amennyiben azt feltételezzük, hogy a Visual Studio a nugetek cachelése miatt nem működik úgy, ahogy az elvárt lenne, abban az esetben lehetőségünk van a lokális cache-t üríteni.

GUI megoldás:
ToolsOptionsNuGet Package ManagerPackage manager settings Clear All Nuget cache

CLI megoldás:
1. nuget.exe beszerzése – https://dist.nuget.org/win-x86-commandline/latest/nuget.exe
2. Parancs kiadása

nuget locals all -clear
This content has 4 years. Some of the information in this post may be out of date or no longer work. Please, read this page keeping its age in your mind.