Xamarin Forms: White screen between page push and pop solved

If you are experiencing white screen when pushing to Navigation or Modal stack on Android, read on.

I’m not sure is this a bug in Xamarin Forms or not, but I guess this is, because it comes only in certain scenarios, and not always.

What is happening, how do you notice this error?

You have got a NavigationPage. You are pushing a new page to the navigationstack, and the page is not getting rendered, only a blank white screen displays.

If you are rotating the device, the page is getting rendered well.

My environment was:
Xamarin.Forms: 4.8 up to 5.0
Device: Samsung Galaxy A12
Visual Studio 2019 Professional with Xamarin.Android SDK 11.4.0.5

Solution

Always invoke the INavigation’s methods on the applications Main Thread. UI changes must go always on the UI thread of the application.

Create a class which wraps the INavigation presented by your Views. It’s handy to store a reference in this class to the Applications Current MainPage’s INavigation instance, so try to build your code to supply the actual INavigation Instance every time to this class when the application’s mainpage is set.

	public class NavigationDispatcher : INavigation
	{
		private INavigation _navigation;

		public IReadOnlyList<Page> ModalStack => _navigation?.ModalStack;

		public IReadOnlyList<Page> NavigationStack => _navigation?.NavigationStack;

		private void SetNavigation(INavigation navigation)
		{
			_navigation = navigation;
		}

		public void InsertPageBefore(Page page, Page before)
		{
			_ = Xamarin.Essentials.MainThread.InvokeOnMainThreadAsync(() =>
			  {
				  _navigation.InsertPageBefore(page, before);
			  });
		}

		public Task<Page> PopAsync()
		{
			return Xamarin.Essentials.MainThread.InvokeOnMainThreadAsync(async () =>
			{
				return await _navigation.PopAsync();
			});
		}

		public Task<Page> PopAsync(bool animated)
		{
			return Xamarin.Essentials.MainThread.InvokeOnMainThreadAsync(async () =>
			{
				return await _navigation.PopAsync(animated);
			});
		}

		public Task<Page> PopModalAsync()
		{
			return Xamarin.Essentials.MainThread.InvokeOnMainThreadAsync(async () =>
			{
				return await _navigation.PopModalAsync();
			});
		}

		public Task<Page> PopModalAsync(bool animated)
		{
			return Xamarin.Essentials.MainThread.InvokeOnMainThreadAsync(async () =>
			{
				return await _navigation.PopModalAsync(animated);
			});
		}

		public Task PopToRootAsync()
		{
			return Xamarin.Essentials.MainThread.InvokeOnMainThreadAsync(async () =>
			{
				await _navigation.PopToRootAsync();
			});
		}

		public Task PopToRootAsync(bool animated)
		{
			return Xamarin.Essentials.MainThread.InvokeOnMainThreadAsync(async () =>
			{
				await _navigation.PopToRootAsync(animated);
			});
		}

		public Task PushAsync(Page page)
		{
			return Xamarin.Essentials.MainThread.InvokeOnMainThreadAsync(async () =>
			{
				await _navigation.PushAsync(page);
			});
		}

		public Task PushAsync(Page page, bool animated)
		{
			return Xamarin.Essentials.MainThread.InvokeOnMainThreadAsync(async () =>
			{
				await _navigation.PushAsync(page, animated);
			});
		}

		public Task PushModalAsync(Page page)
		{
			return Xamarin.Essentials.MainThread.InvokeOnMainThreadAsync(async () =>
			{
				await _navigation.PushModalAsync(page);
			});
		}

		public Task PushModalAsync(Page page, bool animated)
		{
			return Xamarin.Essentials.MainThread.InvokeOnMainThreadAsync(async () =>
			{
				await _navigation.PushModalAsync(page, animated);
			});
		}

		public void RemovePage(Page page)
		{
			_ = Xamarin.Essentials.MainThread.InvokeOnMainThreadAsync(() =>
			  {
				  _navigation.RemovePage(page);
			  });
		}
	}

Remarks

Consider a check for the current thread in the methods body.
If they are being executed in the main thread, you won’t need to switch to the main again
.

Bug is reported on Github: https://github.com/xamarin/Xamarin.Forms/issues/11993

This content has 3 years. Some of the information in this post may be out of date or no longer work. Please, read this page keeping its age in your mind.

Xamarin Forms: Close applications programmatically

In some scenarios, we need to programmatically close our application. We can do it in our common code with Xamarin Forms too. Buuuuuut …….

Can we close an iOS application?

There is no API provided for gracefully terminating an iOS application.

In iOS, the user presses the Home button to close applications. Should your application have conditions in which it cannot provide its intended function, the recommended approach is to display an alert for the user that indicates the nature of the problem and possible actions the user could take — turning on WiFi, enabling Location Services, etc. Allow the user to terminate the application at their own discretion.

Do not call the exit function. Applications calling exit will appear to the user to have crashed, rather than performing a graceful termination and animating back to the Home screen.

Source: https://developer.apple.com/library/archive/qa/qa1561/_index.html

Close on Android from Forms code

There is one important place to implement closing apps from code: When you are handling back button presses by yourself.

Imagine, that you have a main screen, which is the root page. When a users presses the hardware back button you should display a confirmer, that says “Do you really want to close the application?”

If the user choose yes, you should make a call like this:

					DependencyService.Get<IPlatformSpecificService>().CloseApplication();

The definition of the IPlatformSpecificService should be look like this:

	public interface IPlatformSpecificService
	{
		void CloseApplication();
	}

And the Android implementation of the IPlatformSpecificService should be something like:

using Plugin.CurrentActivity;

[assembly: Dependency(typeof(DeviceSpecificService))]
namespace AnAwesomeCompany.AGreatProduct.Droid.DependencyServices
{
	public class PlatformSpecificService: IPlatformSpecificService
	{
		public void CloseApplication()
		{
			CrossCurrentActivity.Current.Activity.FinishAndRemoveTask();
		}
	}
}

Activity supports a lot of closing methods of the application. FinishAndRemoveTask will clear the app from the recents list too.

Take a look at official Android documentation at: https://developer.android.com/reference/android/app/Activity#finishAndRemoveTask()

This content has 3 years. Some of the information in this post may be out of date or no longer work. Please, read this page keeping its age in your mind.

Xamarin Forms: Logging with anything from Console to SQLite

And it’s also logging the invoked method name, and the file name containing the method!

My Forms.RecurrenceToolkit NuGet package pack is now extended with logging functionality.

You can use the pre-written Console and SQLite logger without writing much code, or you can implement your own logger in a few lines, and use it instantly simultaneous with other loggers.

Install banditoth.Forms.RecurrenceToolkit.Logging.* packages, and enjoy the painless logging, and focus on the great ideas instead of being a copy paste robot. 🙂

Usage

In your App.xaml.cs, initalize the logger like:

LoggingProvider.Initalize(
	// If you have installed the console logger:
	new ConsoleLogger(),
	// If you have installed SQLite Logger:
	new SQLiteLogger()
	);

The logger is including the calling method’s name, and the .cs file name in the logs. You can access the logger from anywhere by calling these methods:

LoggingProvider.LogCritical("It's a critical message");
LoggingProvider.LogDebug("It's a debug message");
LoggingProvider.LogError("It's an error message");
LoggingProvider.LogException(new Exception(), "It's an exception");
LoggingProvider.LogInformation("It's an information message");
LoggingProvider.LogTrace("It's a trace message");
LoggingProvider.LogTrace(new StackTrace());
LoggingProvider.LogWarning("It's a warning message");

By default, the console and the SQLite logger logs exceptions in error level.

You can implement your own logger by deriving from BaseLogger class, like:

public class CustomLogger : BaseLogger
	{
		public CustomLogger() : base(new LoggerOptions()
		{
			IncludeCallerSourceFullFileName = true, // This will print C:/Users/Path/AssemblyFile.cs
			IncludeCallerSourceShortFileName = false, // This will print AssemblyFile.cs
			ExceptionLevel = Enumerations.LogLevel.Error, // The LogExceptions calls routed to log to the loglevel set.
			IncludeCallerMethodName = true // This can print the calling method's name
		})
		{

		}
		
		public override void LogCritical(string criticalMessage, string callerMethod, string filePath)
		{
			// Your own method
		}

		// .. File continues

Follow for more

https://github.com/banditoth/Forms.RecurrenceToolkit

This content has 3 years. Some of the information in this post may be out of date or no longer work. Please, read this page keeping its age in your mind.

Xamarin and Aspect Orientated Programming

I have started implementing my very first AOP like library, which is now available for testing in NuGet.org as a pre-release version.

This package is a part of my Xamarin.Forms Toolkit, and it is a good time to say thank you for using all of the three packages more than 500 times.
When I had published them, I thought the only user will be me. 🙂

In the first release of the package (1.0.0-pre-01), you can decorate your methods with attributes, in order to listen for Entering the method, and Exiting the method.

This can be handy for example, when you need to log your method invocations (Firebase analytics, Basic logging) or when you need to measure the elapsed time of the method run.

    [ConsoleYaay]
    public void BoringMethod()
    {
        Console.WriteLine(DateTime.Now);
    }

For example, the following code above will result the output below:

yaaay on enter!
2021. 05. 25. 16:56:01
yaaaay on exit

This can be achieved implementing IMethodDecorator class like this:

    [System.AttributeUsage(System.AttributeTargets.Method)]
    public class ConsoleYaay : Attribute, IMethodDecorator
    {
        public ConsoleYaay()
        {

        }

        public void OnEnter()
        {
            Console.WriteLine("yaaay on enter!");
        }

        public void OnExit()
        {
            Console.WriteLine("yaaaay on exit");
        }
    }

Try it in your project

Let’s jump to https://github.com/banditoth/Forms.RecurrenceToolkit/ to see the code, or https://www.nuget.org/packages/banditoth.Forms.RecurrenceToolkit.AOP/ to download it as a package

Future improvements

This package can be improved in a lot of aspects, so stay tuned for more details. Or just simply make a pull request with your ideas 🙂

This content has 3 years. Some of the information in this post may be out of date or no longer work. Please, read this page keeping its age in your mind.

Complete CI/CD tutorial for Xamarin Android with Google Play publish in Azure DevOps | Part 2.

If you haven’t seen part 1, click here, and start build up your CI/CD pipeline now.

Part 2 Contains:

  • Configuring build with creating signed APK, and making artifacts from it
  • Setting up branch policy to master

Configure some magic

Let’s go back to Pipelines. Edit your previously created pipeline by clicking the three dot on the pipelines row.

Edit the previously created pipeline

CI is based on cloud machines hosted somewhere over the world. This computers called as agents. They are used to follow your instructions, defined in the yml file. The base Xamarin.Android yml is only to build your code. But we will make some additional steps in order to create a signed APK of every build. Follow up, to complete this setup.

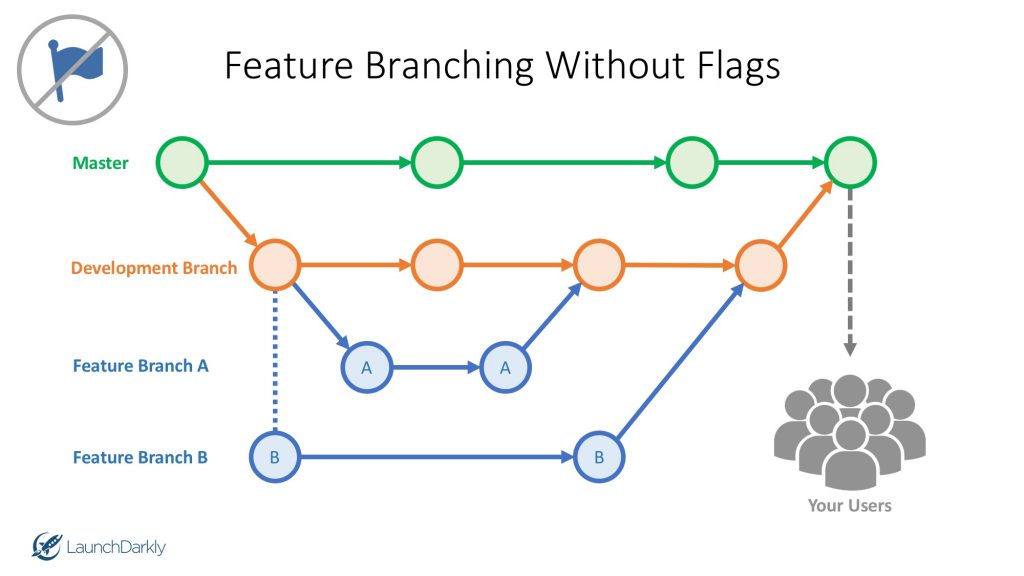
Recommended branching strategy for this is to keep a development branch, and pull request your feature branches to it, and finally pull request the development branch to the master, and keep your master is always at your production version. The figure below shows visually this method. Source: https://dzone.com/articles/feature-branching-using-feature-flags-1

Create a signed APK or bundle from every build

First, set up some variables for this pipeline. You will find a Variables button on the right top of the tab. Click on it.

Add variables with new variable button

Let’s add a new variable by clicking the “New variable” button. We will need 4 vars.

Adding a new variable.

Remember, that i told you, you will need to remember the alias, password, and the keystore name? You can forget them, after you have declared the variables for them.

Variables needed:
keystore_filename - AnAwesomeAppDelivery.keystore
keystore_alias - AnAwesomeAppDelivery
keystore_password - The password of the keystore.

When you create var for keystore_password, tick the “Keep this value secret” checkbox.

Go to the end of the boilerplate YAML file, and on the right top of the text editor, you can see a task wizard button. Click on that.

Search for “Download secure file” task on the search bar. Click on it, and set the “Secure file” to the value below, and click on “Add”.

$(keystore_filename)

This will get the variable value defined above. Press some enters to seperate our next task from the download secure file task, and jump into signing the APK.

Search for “Android signing” in tasks.

Android signing task

And set up the task like on the picture below. Please regret me for messing up the “Key password” value in the screenshot, the $(keystore_password) variable goes in that field too.

Setting up Android signing task

If everything set up correctly, it will make our APK in the output directory signed. But how we will access it? We need to drop our result to the pipeline artifacts. You can set the build output to the artifact staging directory, but i recommend to only copy the file, that you will need as a result. So make a copy task after Adding the Sign task, and some enters to the end of the YAML file. Follow the configurations in the picture.

We will copy every file with APK extension, from the output directory to the ArtifactStagingDirectory.

Okay, we have copied the files, but the files wont appear in Azure DevOps, until we drop our packages to the Artifacts section of our build. Search for “Publish build artifacts”, select the task, and configure as the image below.

Finally creating the result to be ready to download

So how our YAML Looks like now? Like this below? Then go and save it. If not, correct your mistakes.

How your YAML file supposed to look like

After saving the YAML, it recommends to Run it, so jump right into the fun, click on the “Run” button.

The build is running, and creating us the binaries.

If everything is correct, it will show only green ticks. When you click on “Pipelines/pipelines” in the left menu of the DevOps page, you will see your state of your build. On the detailed view, you can access the created artifacts in order to download them.

Of course, a success build for the first try.. 😀

Click on the row, and you can access the details of the build. If you have set up the pipeline correctly, it will show “1 published” label. Click on it, and you can access your signed application binary.

1 published
The signed APK

Merge the pipeline config branch to master

Create a pull request to master.

Set up main branch policies to run CI automatically

Go to Repos/Branches, and select the main branch, click on the three dot in the end of the row, and select “Branch policies”.

Add a build policy to the branch.

In the Build validation option, you can configure the previously created pipeline to run automatically whenever a new pull request gets accepted.

This content has 3 years. Some of the information in this post may be out of date or no longer work. Please, read this page keeping its age in your mind.