If you haven’t seen part 1, click here, and start build up your CI/CD pipeline now.
Part 2 Contains:
- Configuring build with creating signed APK, and making artifacts from it
- Setting up branch policy to master
Configure some magic
Let’s go back to Pipelines. Edit your previously created pipeline by clicking the three dot on the pipelines row.

CI is based on cloud machines hosted somewhere over the world. This computers called as agents. They are used to follow your instructions, defined in the yml file. The base Xamarin.Android yml is only to build your code. But we will make some additional steps in order to create a signed APK of every build. Follow up, to complete this setup.
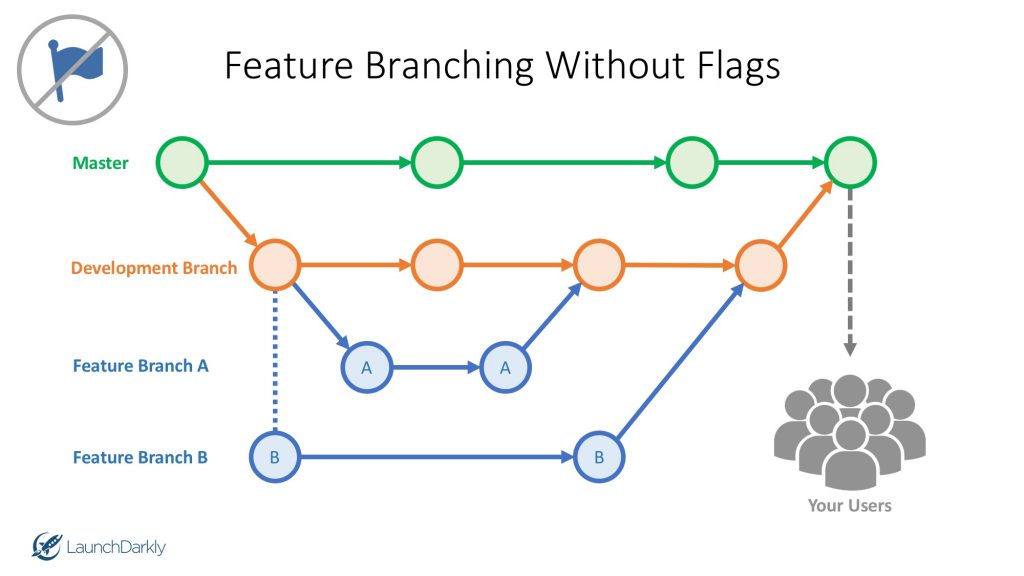
Recommended branching strategy for this is to keep a development branch, and pull request your feature branches to it, and finally pull request the development branch to the master, and keep your master is always at your production version. The figure below shows visually this method. Source: https://dzone.com/articles/feature-branching-using-feature-flags-1

Source: https://dzone.com/articles/feature-branching-using-feature-flags-1
Create a signed APK or bundle from every build
First, set up some variables for this pipeline. You will find a Variables button on the right top of the tab. Click on it.

Let’s add a new variable by clicking the “New variable” button. We will need 4 vars.

Remember, that i told you, you will need to remember the alias, password, and the keystore name? You can forget them, after you have declared the variables for them.
Variables needed:
keystore_filename - AnAwesomeAppDelivery.keystore
keystore_alias - AnAwesomeAppDelivery
keystore_password - The password of the keystore.
When you create var for keystore_password, tick the “Keep this value secret” checkbox.
Go to the end of the boilerplate YAML file, and on the right top of the text editor, you can see a task wizard button. Click on that.

Search for “Download secure file” task on the search bar. Click on it, and set the “Secure file” to the value below, and click on “Add”.
$(keystore_filename)
This will get the variable value defined above. Press some enters to seperate our next task from the download secure file task, and jump into signing the APK.
Search for “Android signing” in tasks.

And set up the task like on the picture below. Please regret me for messing up the “Key password” value in the screenshot, the $(keystore_password) variable goes in that field too.

If everything set up correctly, it will make our APK in the output directory signed. But how we will access it? We need to drop our result to the pipeline artifacts. You can set the build output to the artifact staging directory, but i recommend to only copy the file, that you will need as a result. So make a copy task after Adding the Sign task, and some enters to the end of the YAML file. Follow the configurations in the picture.

Okay, we have copied the files, but the files wont appear in Azure DevOps, until we drop our packages to the Artifacts section of our build. Search for “Publish build artifacts”, select the task, and configure as the image below.

So how our YAML Looks like now? Like this below? Then go and save it. If not, correct your mistakes.

After saving the YAML, it recommends to Run it, so jump right into the fun, click on the “Run” button.

If everything is correct, it will show only green ticks. When you click on “Pipelines/pipelines” in the left menu of the DevOps page, you will see your state of your build. On the detailed view, you can access the created artifacts in order to download them.

Click on the row, and you can access the details of the build. If you have set up the pipeline correctly, it will show “1 published” label. Click on it, and you can access your signed application binary.


Merge the pipeline config branch to master

Set up main branch policies to run CI automatically
Go to Repos/Branches, and select the main branch, click on the three dot in the end of the row, and select “Branch policies”.

In the Build validation option, you can configure the previously created pipeline to run automatically whenever a new pull request gets accepted.
