
If you need a solution to create multilingual applications without the hassle of implementing all kinds of code, I have good news for you. I’ve migrated my Xamarin.Forms package to .NET MAUI, and you can easily build multilingual applications with MAUI. No need to restart the application, the language takes effect immediately and works on all platforms. You can also use it from XAML, and C# code. It can handle multiple resource files at the same time. It can store the last language set by the user, and the next time you restart it, it will use the same language as the last time the user set it. But instead of letters, watch this video to see what exactly it can do:
Let’s get started
This project is available on GitHub: https://github.com/banditoth/MAUI.Packages
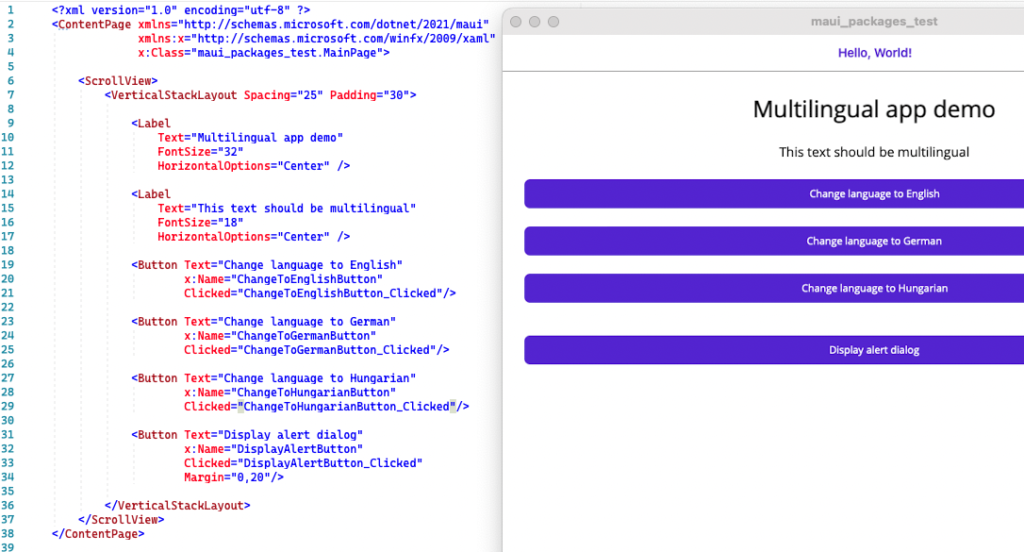
To start with, I’ve put together a demo app for you for the sake of demonstration. There is no extra functionality, just 4 buttons. Three of them are to change the language of the application, and one of them is to give us a pop-up window. There is no logic to it yet, but together we will build on the article.
Create translation files
The first thing you will need are files containing multilingual translations. If you are familiar with Xamarin Forms, I will not surprise you: we will use files with RESX extension. By default, all MAUI applications include a directory called Resources. In this directory, I create a directory called Translations next to the Fonts, Images, and Raw directories, where I put the translations used by the application.

Decide what the default language of your application should be. This is important because the default language is not indicated by a language code at the end of the filename. This language (and file) will be the one that the application will use as fallback, so that if, say, the application can’t find the text in the Hungarian or German translations, it can print it out in that language. In my case, the default language of the application will be English, so I didn’t specify it in the filename.
I’ve created translations for each language with this data:
	<data name="WelcomeMessage" xml:space="preserve">
		<value>The quick brown fox jumps over the lazy dog</value>
	</data>
	<data name="AlertTitle" xml:space="preserve">
		<value>Important notice</value>
	</data>
	<data name="AlertContent" xml:space="preserve">
		<value>.NET Bot is cute!</value>
	</data>
	<data name="AlertConfirm" xml:space="preserve">
		<value>Agree</value>
	</data>
Since ResX files are set by default to generate a code-behind file from their data, this automatic generation should be disabled for all ResX files other than the default language.
This can be easily done on windows, just click on the file (in this case the German translation) and in the properties window, under Custom tool, clear the ResxFileCodeGenerator value. If you are using Visual Studio on a Mac, you cannot delete this from the interface, so you have to manually remove the option in the project file.
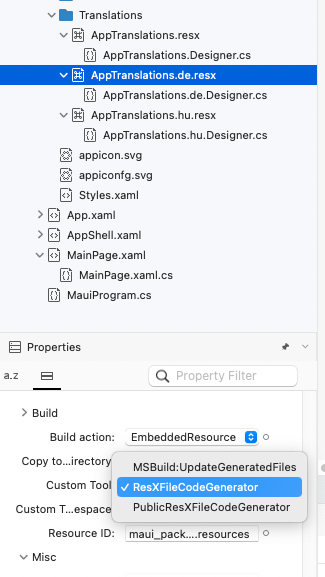
For Visual Studio for mac, find the name of the files containing the translation in the project and delete the following lines:
        <Generator>ResXFileCodeGenerator</Generator>
        <LastGenOutput>AppTranslations.de.Designer.cs</LastGenOutput>
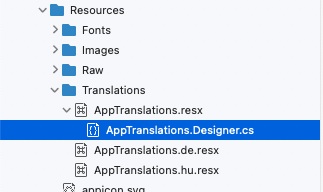
If you did everything right, you will only have these files. If there are any ‘.Designer’ files left in the Solution, feel free to delete them. The important thing is that when you compile the application, they are not recreated by Visual Studio
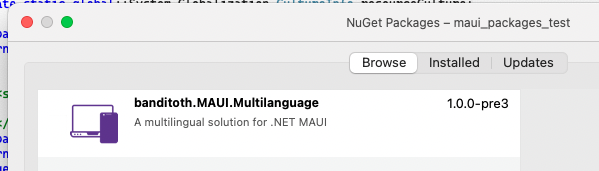
Install banditoth.MAUI.Multilanguage
Click on your project with right, then select ‘Manage NuGet Packages’. Search for banditoth.MAUI.Multilanguage in the search bar, and install the result with the exact same name of your search text 🙂 This project is available on GitHub by the way, so if you are experiencing issues with it, you can report over here: https://github.com/banditoth/MAUI.Packages
Initialise the component
Let’s navigate to your MauiProgram.cs file, and add some init logic in it!
	public static MauiApp CreateMauiApp()
	{
		var builder = MauiApp.CreateBuilder();
		builder
			.UseMauiApp<App>()
			.ConfigureFonts(fonts =>
			{
				fonts.AddFont("OpenSans-Regular.ttf", "OpenSansRegular");
				fonts.AddFont("OpenSans-Semibold.ttf", "OpenSansSemibold");
			})
            .ConfigureMultilanguage(config =>
            {
                // Set the source of the translations
                // You can use multiple resource managers by calling UseResource multiple times.
                config.UseResource(AppTranslations.ResourceManager);

                // If the app is not storing last used culture, this culture will be used by default
                config.UseDefaultCulture(new System.Globalization.CultureInfo("en-US"));

                // Determines whether the app should store the last used culture
                config.StoreLastUsedCulture(true);

                // Determines whether the app should throw an exception if a translation is not found.
                config.ThrowExceptionIfTranslationNotFound(false);

                // You can set custom translation not found text by calling this method
                config.SetTranslationNotFoundText("Transl_Not_Found:", appendTranslationKey: true);
            });

        return builder.Build();
	}
Use it in code
Usage in XAML
In order to use our translations in XAML files, we need to declare the tool’s namespace in XAML. Go to the top of your XAML file, and make the following declaration:
xmlns:multilanguage="clr-namespace:banditoth.MAUI.Multilanguage;assembly=banditoth.MAUI.Multilanguage"
After this declaration you can access the translation tool, so let change this code:
            <Label
                Text="This text should be multilingual"
                FontSize="18"
                HorizontalOptions="Center" />
to this:
            <Label
                Text="{multilanguage:Translation Key=WelcomeMessage}"
                FontSize="18"
                HorizontalOptions="Center" />
Usage in C# code
Wherever we need to pass multilingual texts to or from another method, the ITranslator interface comes in handy. This interface is registered in the MAUI ‘s dependency container, so it can be retrieved from the container by constructor injection for example.
    private readonly ITranslator translator;

	public MainPage(ITranslator translator)
	{
		InitializeComponent();
        this.translator = translator;
    }
Unfortunately currently .NET MAUI is not supporting Constructor injection for Shell, but you can request any service from anywhere by adding this little work around to App.xaml.cs (but its definitely not nice):
	public App(IServiceProvider serviceProvider)
	{
		InitializeComponent();
        ServiceProvider = serviceProvider;
		MainPage = new AppShell();
    }

    public static IServiceProvider ServiceProvider { get; private set; }
The localized string can be retreived like this (This example shows an Alert dialog for the user in the correct language)
    void DisplayAlertButton_Clicked(System.Object sender, System.EventArgs e)
    {
        _ = DisplayAlert(translator.GetTranslation("AlertTitle"),
            translator.GetTranslation("AlertContent"),
            translator.GetTranslation("AlertConfirm"));
    }
Change language runtime
To change language, you need to call the SetCurrentCulture method with the desired CultureInfo, like this:
    void ChangeToEnglishButton_Clicked(System.Object sender, System.EventArgs e)
    {
        translator.SetCurrentCulture(new CultureInfo("en"));
    }

    void ChangeToGermanButton_Clicked(System.Object sender, System.EventArgs e)
    {
        translator.SetCurrentCulture(new CultureInfo("de"));
    }

    void ChangeToHungarianButton_Clicked(System.Object sender, System.EventArgs e)
    {
        translator.SetCurrentCulture(new CultureInfo("hu"));
    }
