Values hard coded to an application is the brightest “DO NOT” thing in software development. But how to bring your Azure Function more professional level?
Start using application settings
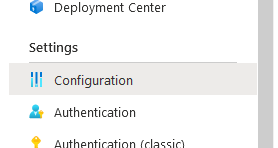
You can define key value pairs on the Microsoft Azure portal for your Function app. Go to your app and find the Settings section, and click on the configuration button.
Configuration item
You can add your keys and values by clicking the New application setting button.
Adding a new setting
Application Settings are exposed as environment variables for access by your application at runtime. Learn more
Access your settings from your code
You can access your newly created setting from C# using the GetEnvironmentVariable call.
You do not need to add and modify the environment variables in your operating system. Add a new json file to your solution called ‘local.settings.json’, and fill it up with some data like below:
This content has 3 years. Some of the information in this post may be out of date or no longer work. Please, read this page keeping its age in your mind.
When trying to return with a complex object in .NET Core API, which has a Type property in it, the serializer gives the following exception :
System.NotSupportedException: Serialization and deserialization of 'System.Type' instances are not supported and should be avoided since they can lead to security issues.
Workaround: Declare an enumeration for your types (ex: enum { string, int, etc }) you can parse the value for the requested type explicitly.
This content has 3 years. Some of the information in this post may be out of date or no longer work. Please, read this page keeping its age in your mind.
There are tons of newly created logging engines for .NET Core. Log4Net is stable, old school technology in the market. Consider using newer logging technologies, such as NLog or Serilog. But if you want to use this engine, you can make it work.
If the “AddLog4Net” method call is unrecognized by IntelliSense, make sure you have installed the Logging extension NuGet package mentioned above.
Add a new file to your project, and name it log4Net.config. The template should be used is Web Configuration file.
Make changes in the newly generated file, here you can configure the applications logging. I’ve skipped Console logging, Microsoft’s console logger visualize logs much greater. You can learn configuring Log4Net more at https://logging.apache.org/log4net/release/manual/configuration.html A quick start configuration example:
This content has 3 years. Some of the information in this post may be out of date or no longer work. Please, read this page keeping its age in your mind.
You may want to host your .NET Core application in a Windows computer, even a Windows server. You want to get rid of Console windows, and do not want to start the app manually after the computer is started, or restart it when the application has crashed. This tutorial helps you to make a windows service from your .NET Core application, especially a .NET Core WebAPI.
Install the “Microsoft.Extensions.Hosting.WindowsServices” NuGet package for you .NET Core application. This can be achieved from NuGet package manager console:
This is all of the code change you need to do. Let’s Publish your application.
Publish your application to a folder
Make the following changes in the following dialog by pressing an edit button next to a summary label.
Set the deployment mode toself-contained
Click on Publish. Once the publish is done, copy the published files to a specific directory of the computer, or an another computer. Run the powershell script above, to create a new windows service on the hosting computer.
Do NOT forget to set the inbound policies for your application in Advanced Windows Firewall. Also keep in mind, if you want to access your web application outside of your local network, you need to forward ports on your router.
This content has 3 years. Some of the information in this post may be out of date or no longer work. Please, read this page keeping its age in your mind.